Sunday, January 16, 2011

Student work

0 comments

I always ask my students to send me pictures of their finished projects so that I can post them on the blog. Phyllis from Columbus just sent me this photo from my class “Autumn Glory”

I was in your class when you came to Columbus in November. Attached are 2 pictures of my finished project. I also put it on my blog here: http://phylsquiltsbooks.blogspot.com/

Thanks again for such a fun and interesting class. I love the cheerfulness of the quilt, especially on a cold, dark winter night :-)

Best wishes,

Phyllis

"She makes her own quilts"--Prov. 31:22 (NJB)

columbusoh2010

Friday, January 14, 2011

Second dye gradation

0 comments

I think it is really fun if you dye fabric with a friend. Especially if you have never done anything like this before. I suggest that you each take a turn mixing the dyes and then squishing the fabric. It is especially nice if you designate a “clean” person and a “dirty” person. The clean person handles the fabric and the dirty person handles the dye, and then you switch. Make a day of it doing all the gradations. You will be very tired but you will have a lot of fun laughing and working together.

Once you have finished the first gradation you can now make a second gradation. From each of the 3 basic mixed dyes in the original quart bottles – yellow, red and a blue – measure out 1/2 cup of dye. Place each color separately into a new quart container. To each container add 2 cups of water. Shake the containers well to mix or place them back in the blender and mix well. Use these 3 new basic dyes to dye a new set of 1-12 fat quarters using the gradation chart in the book. This gradation will produce a light value set of colors.

Then your third gradation of colors will be a “blackened” value of colors. For the third gradation, we will add mixed black dye to the 3 basic colors that are left in the original bottles. As with the other gradations, have 12 new numbered fabrics ready in the sodium carbonate water and do your third set.

You will end up with three value sets of gradations – medium, dark and light.

036

Medium value (original set) blackened set and light value set. Yellow, Red, Blue.

You can also do a whole set with the dyes Lemon Yellow, Fuchsia and Turquoise.

And of course there are lots of yellows, reds and blues out there to experiment with.

IMG_2108 Every dyer needs a little helper.

Thursday, January 13, 2011

And the winner is …

1 comments

Every Wednesday this month I will have a drawing to give away a stack of color gradations made from the directions in my book. Then on Thursday some lucky winner will be mailed their four fat quarters of hand dyed fabric. Send me an email with your name and address, and I will add you to the hat for a chance to win. At the end of the month, I will pull one lucky winner from among all the names that I have collected in the hat who will receive a free copy of my book.  And if you look on my website this month all orders over $30 will receive a free 48-5” packet of precut hand dyed fabric squares. What at deal.

I am still having a great response to my offer, everyone who didn’t win this time will stay in the hat for the next drawing, so please don’t send your name again, BUT if you know of someone who might be interested in getting their name in the hat please send them a link to my blog. And to keep up to date on all the posts about Dyeing you can become a subscriber, just click on the button to the right.

IMG_0952 My friend Laura Wasilowski picked the name out of the hat (bowl) this week. And the winner is ta ta ta da –

Carol-Lynn VanNorman of Mio MI

Hurrah for Carol-Lynn You will receive four quarter yards of my “Four Fall Fabrics”. These are so fabulous I know you will make something fiberlicious out of them.

fallfourfabric

Wednesday, January 12, 2011

Doing the gradation

6 comments

Once I have my three main dyes mixed and my fabric soaking, I take time to clean up the area I will be working on and to set out the containers I will put my dyed fabric in.

I want to clear away the blender and the dye powder containers and set out my smaller containers to hold the dyed fabric. I like to use small glad ware like containers rather than zip lock baggies. I like them for two reasons. 1. They are stackable once they are filled and 2. They are much easier to clean and use again.

017-1

You will need a dozen small containers to put your dyed fabric in. I got mine at the dollar store. I also like to have a small bowl with water in it to rinse my hands in rather than constantly turning on and off the water facet. Remember you want to keep your hands clean when you start the dyeing process because where dye lands dye stays and if you pick up your clean white fabric with yellow dye on your fingers you will have yellow dots on your next gradation. Again it is one of the reasons I keep a towel tucked into my waist.
028-1

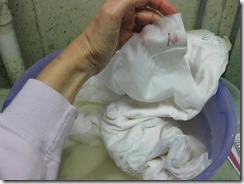
I am going to use the chart in my book for the 12 step dye gradation. I start by dyeing the first fat quarter with a 1/4 cup of yellow dye. I pull out the number one fabric from the top of the pile that is soaking in my bucket and place it in my small glad ware container or a dishpan. I pour the 1/4 cup of yellow dye over the fabric and with my IMG_0434gloved hands I “squish ” it around. Squish is a technical term I like to use. I want to make sure that the dye gets on all the fabric as evenly as possible. I have found that it takes about a cup of dye to dye about a yard of a fabric, so I can use 1/4 cup of dye for a 1/4 yard of fabric. Heavier fabrics will soak up more dye.

I will have excess dye in the bottom of the container, do not be tempted to pour it back in the big dye bottle. Once the dye and the sodium carbonate mix they begin to bond and you don’t want the sodium carbonate water to mix with the dye water.

In my experience, if you leave the excess dye in the container it will make your fabric more mottled, if you pour it off your fabric will be more solid. You can choose which you want to do, leave the excess dye in the container or pour it out. I usually have an extra piece of fabric in a dishpan and I pour all of my left over dye on it. This creates “mystery” fabric.

075

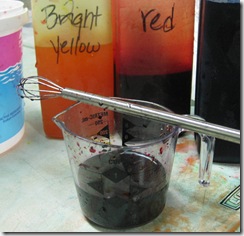
Now that I have finished squishing the dye around I rinse my hands and put a lid on the container and then start the next step in the gradation. 1/4 Yellow with 1 tsp of Red. When I begin to mix the dyes together I add them to a larger measuring cup and use a whisk to beat the colors together. If you don’t do this they will not blend well and you will get mottled colors.
056

When you have worked through all the colors you can stack up the containers and let them sit over night. Anywhere from 2-24 hours is a good time frame. I like to let them sit for at least 6-8 hours.

031

More to come….

049 Dyeing on a summer day. I can let the fabrics lay out in the sun and they will dry in about 1/2 hour. Then they are ready to wash.

easteregg I call this gradation “Easter Egg” while it is not really bright the lime green to purple makes me think of Easter Eggs. This is one of my “favorite” color combinations.

friedaandersongreenjack This little Jack in the Pulpit using all of the colors of “Easter Egg” gradation.

Tuesday, January 11, 2011

Dragon Threads Ltd

0 comments

My friend Linda Teufel is the publisher of Dragon Threads. She has a great blog that you should check out. This week she is giving away a free JANE SASSAMAN pattern.

www.dragonthreads.com
www.dragonthreadsopenbook.blogspot.com

Safety and mixing the dyes

1 comments
It is very important to use common sense and safety measures when you are mixing your dyes. I always wear a non porous mask so that I do not inhale any dry dye particles. While the dyes are not toxic they can cause allergic reactions.

You want to make sure that you are wearing gloves, I use disposable ones but certainly reusable rubber gloves are great. I didn't like them because they were too large on my hands. But recently I found some rubber gloves at JoAnn's that are smaller and fit my hand nice. They were in the gardening section.
You should designate some old clothes for your dye clothes. I have several pair of old jeans, tee shirts and a few sweat shirts, a pair of old shoes and socks. And I always wear an apron over that.

I also like to have a stack of old wash clothes handy and I keep a clean one tucked into my waist to wipe my hands on when I am working. I rewash the clothes when I rinse out the dyed fabric which I will talk about later.

 I place an old towel or newspapers on the surface I will be mixing my dyes. I spritz this with water so that it is moist. This surface then will catch any stray dye powder that may spill while you are working, and stay where it lands and can be easily cleaned up later. I use an older blender to mix the dyes and I place the blender inside a dish pan. This will catch any of the spills when I am mixing the dye in the blender.
I want to have my containers that will hold the mixed dye ready and open to put the mixed dye in once I have blended it. I usually work on top of my washing machine and a long table so that I have lots of room for all the things I am working with.

To mix the dyes I use regular mixing Tablespoons and teaspoon and regular measuring cups. I like the mixing spoons that are on a ring that way I can always find the right one when I need it.
For each of the three colors that I will mix a have a separate container to put the dye in and I like to label them so that I can see at a glance what color I will be using. While this seems a bit redundant as you can see the difference in colors, it helps me visually distinguish between them.

 To mix the dyes I add 4 cups of hot water to my blender. For each color I use 2 level TABLEspoons placed in the blender with the hot water and blended on high for about 30 seconds. Pour the blended dye into the larger container marked with the correct color. I blend three colors to do the gradation. Yellow, Red, and Blue. That is the warm color gradation. Lemon Yellow, Fuchsia and Turquoise is a separate cool color gradation. Mixing the gradation will be next...


Pink Sunrise


 Pink Sunrise is one of those gradations that just looks like you want to eat it. It reminds me of rainbow sherbet. I used these colors to make the flowers in this little "Starburst Lillies" quilt.

Monday, January 10, 2011

Caryl Bryer Fallert

2 comments
Caryl Bryer Fallert just posted on the QuiltArt List that she has finished two new quilts this past year. I went to her site to check them out. They are quite wonderful and well worth a look.
I meet Caryl many years ago. Caryl grew up in the same town that I currently live in and we were part of a professional art group together PAQA. Caryl is a very generous and encouraging friend. She always has a kind word to share and is generous in sharing information and help, and of course her work is an inspiration to us all.

Print this page